Manage groups
Use groups to manage one or more related projects at the same time.
NOTE: Self-managed customers should create a top-level group so you can see an overview of your organization. For more information about efforts to create an organization view of all groups, see epic 9266. A top-level group can also have one complete Security Dashboard and Center, Vulnerability and Compliance Report, and Value stream analytics.
View groups
To view groups, on the top bar, select Main menu > Groups > View all groups.
The Groups page shows a list of groups, sorted by last updated date.
- To explore all public groups, select Explore groups.
- To view groups where you have a direct or indirect membership, select Your groups. This tab shows groups that you are a member of:
- Through membership of a subgroup's parent group.
- Through direct or inherited membership of a project in the group or subgroup.
Create a group
To create a group:
- On the top bar, either:
- Select Main menu > Groups > View all groups, and on the right, select New group.
- To the left of the search box, select the plus sign and then New group.
- Select Create group.
- Enter a name for the group in Group name. For a list of words that cannot be used as group names, see reserved names.
- Enter a path for the group in Group URL, which is used for the namespace.
- Choose the visibility level.
- Personalize your GitLab experience by answering the following questions:
- What is your role?
- Who is using this group?
- What are you using this group for?
- Invite GitLab members or other users to join the group.
For details about groups, watch GitLab Namespaces (users, groups and subgroups).
Remove a group
To remove a group and its contents:
- On the top bar, select Main menu > Groups and find your group.
- On the left sidebar, select Settings > General.
- Expand the Advanced section.
- In the Remove group section, select Remove group.
- Type the group name.
- Select Confirm.
A group can also be removed from the groups dashboard:
- On the top bar, select Main menu > Groups > View all groups.
- Select Your Groups.
- Select ({ellipsis_v}) for the group you want to delete.
- Select Delete.
- In the Remove group section, select Remove group.
- Type the group name.
- Select Confirm.
This action removes the group. It also adds a background job to delete all projects in the group.
Specifically:
-
In GitLab 12.8 and later, on GitLab Premium or higher tiers, this action adds a background job to mark a group for deletion. By default, the job schedules the deletion 7 days in the future. You can modify this waiting period through the instance settings.
-
In GitLab 13.6 and later, if the user who sets up the deletion is removed from the group before the deletion happens, the job is cancelled, and the group is no longer scheduled for deletion.
Remove a group immediately (PREMIUM)
Introduced in GitLab 14.2.
If you don't want to wait, you can remove a group immediately.
Prerequisites:
- You must have the Owner role for a group.
- You have marked the group for deletion.
To immediately remove a group marked for deletion:
- On the top bar, select Main menu > Groups and find your group.
- On the left sidebar, select Settings > General.
- Expand Advanced.
- In the "Permanently remove group" section, select Remove group.
- Confirm the action when asked to.
Your group, its subgroups, projects, and all related resources, including issues and merge requests, are deleted.
Restore a group (PREMIUM)
Introduced in GitLab 12.8.
To restore a group that is marked for deletion:
- On the top bar, select Main menu > Groups and find your group.
- Select Settings > General.
- Expand the Path, transfer, remove section.
- In the Restore group section, select Restore group.
Request access to a group
As a user, you can request to be a member of a group, if an administrator allows it.
- On the top bar, select Main menu > Groups and find your group.
- Under the group name, select Request Access.
As many as ten of the most-recently-active group owners receive an email with your request. Any group owner can approve or decline the request.
If you change your mind before your request is approved, select Withdraw Access Request.
Filter and sort members in a group
- Introduced in GitLab 12.6.
- Improved in GitLab 13.7.
- Feature flag removed in GitLab 13.8.
To find members in a group, you can sort, filter, or search.
Filter a group
Filter a group to find members. By default, all members in the group and subgroups are displayed.
In lists of group members, entries can display the following badges:
- SAML, to indicate the member has a SAML account connected to them.
- Enterprise, to indicate that the member is an enterprise user.
- On the top bar, select Main menu > Groups and find your group.
- Above the list of members, in the Filter members box, enter filter criteria.
- To view members in the group only, select Membership = Direct.
- To view members of the group and its subgroups, select Membership = Inherited.
- To view members with two-factor authentication enabled or disabled, select 2FA = Enabled or Disabled.
- In GitLab 14.0 and later, to view GitLab users created by SAML SSO or SCIM provisioning select Enterprise = true.
Search a group
You can search for members by name, username, or email.
- On the top bar, select Main menu > Groups and find your group.
- On the left sidebar, select Group information > Members.
- Above the list of members, in the Filter members box, enter search criteria.
- To the right of the Filter members box, select the magnifying glass ({search}).
Sort members in a group
You can sort members by Account, Access granted, Max role, or Last sign-in.
- On the top bar, select Main menu > Groups and find your group.
- On the left sidebar, select Group information > Members.
- Above the list of members, in the upper-right corner, from the Account list, select the criteria to filter by.
- To switch the sort between ascending and descending, to the right of the Account list, select the arrow ({sort-lowest} or {sort-highest}).
Add users to a group
You can give a user access to all projects in a group.
Prerequisite:
- You must have the Owner role.
- On the top bar, select Main menu > Groups and find your group.
- On the left sidebar, select Group information > Members.
- Select Invite members.
- Fill in the fields.
- The role applies to all projects in the group. For more information, see permissions.
- On the Access expiration date, the user can no longer access projects in the group.
- Select Invite.
Members that are not automatically added are displayed on the Invited tab. Users can be on this tab because they:
- Have not yet accepted the invitation.
- Are waiting for approval from an administrator.
- Exceed the group user cap.
Remove a member from the group
Prerequisites:
- You must have the Owner role.
- The member must have direct membership in the group. If membership is inherited from a parent group, then the member can be removed from the parent group only.
To remove a member from a group:
- On the top bar, select Main menu > Groups and find your group.
- On the left sidebar, select Group information > Members.
- Next to the member you want to remove, select Remove member.
- Optional. On the Remove member confirmation box:
- To remove direct user membership from subgroups and projects, select the Also remove direct user membership from subgroups and projects checkbox.
- To unassign the user from linked issues and merge requests, select the Also unassign this user from linked issues and merge requests checkbox.
- Select Remove member.
Ensure removed users cannot invite themselves back
Malicious users with the Maintainer or Owner role could exploit a race condition that allows them to invite themselves back to a group or project that a GitLab administrator has removed them from.
To avoid this problem, GitLab administrators can ensure removed users cannot invite themselves back.
Add projects to a group
There are two different ways to add a new project to a group:
-
Select a group, and then select New project. You can then continue creating your project.
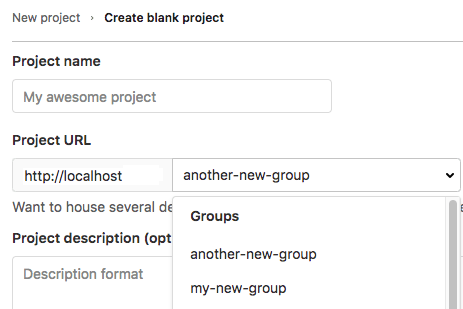
-
While you are creating a project, select a group from the dropdown list.

Specify who can add projects to a group
- Introduced in GitLab 10.5.
- Moved from GitLab Premium to GitLab Free in 11.10.
By default, users with at least the Developer role can create projects under a group.
To change this setting for a specific group:
- On the top bar, select Main menu > Groups > View all groups.
- Select Your Groups.
- Find the group and select it.
- From the left menu, select Settings > General.
- Expand the Permissions and group features section.
- Select the desired option in the Roles allowed to create projects dropdown list.
- Select Save changes.
To change this setting globally, see Default project creation protection.
Add Group README
As a group owner or member, you can use a README to provide more information about your team, and invite users to contribute to your projects. The README is displayed on the group overview page, and can be changed in the group settings. All group members can edit the README.
Prerequisite:
- To create the README from the group settings, you must have the Owner role for the group.
To add a group README:
- On the top bar, select Main menu > Groups and find your group.
- On the left sidebar, select Settings > General.
- In the Group README section, select Add README. This action creates a new project
gitlab-profilethat contains theREADME.mdfile. - On the prompt for creating a README, select Create and add README. You're redirected to the Web IDE, where a README file is created.
- In the Web IDE, edit and commit the
README.mdfile.
Change the owner of a group
You can change the owner of a group. Each group must always have at least one member with the Owner role.
- As an administrator:
- On the top bar, select Main menu > Groups and find your group.
- On the left sidebar, select Group information > Members.
- Give a different member the Owner role.
- Refresh the page. You can now remove the Owner role from the original owner.
- As the current group's owner:
- On the top bar, select Main menu > Groups and find your group.
- On the left sidebar, select Group information > Members.
- Give a different member the Owner role.
- Have the new owner sign in and remove the Owner role from you.
Change a group's path
Changing a group's path (group URL) can have unintended side effects. Read how redirects behave before you proceed.
If you are changing the path so it can be claimed by another group or user, you must rename the group too. Both names and paths must be unique.
After you change the group path, the new group path is a new namespace and you must update the existing project URL in the following resources:
- Include statements.
- Docker image references in CI files.
- Variables that specify a project or namespace.
To retain ownership of the original namespace and protect the URL redirects, create a new group and transfer projects to it instead.
To change your group path (group URL):
- On the top bar, select Main menu > Groups and find your group.
- On the left sidebar, select Settings > General page.
- Expand the Advanced section.
- Under Change group URL, enter a new name.
- Select Change group URL.
WARNING: It is not possible to rename a namespace if it contains a project with Container Registry tags, because the project cannot be moved.
Change the default branch protection of a group
- Introduced in GitLab 12.9.
- Settings moved and renamed in GitLab 14.9.
By default, every group inherits the branch protection set at the global level.
To change this setting for a specific group, see group level default branch protection.
To change this setting globally, see initial default branch protection.
NOTE: In GitLab Premium or higher, GitLab administrators can choose to disable group owners from updating the default branch protection.
Use a custom name for the initial branch
Introduced in GitLab 13.6.
When you create a new project in GitLab, a default branch is created with the first push. The group owner can customize the initial branch for the group's projects to meet your group's needs.
Share a group with another group
- Introduced in GitLab 12.7.
- Changed in GitLab 13.11 from a form to a modal window with a flag. Disabled by default.
- Modal window enabled on GitLab.com and self-managed in GitLab 14.8.
- Generally available in GitLab 14.9. Feature flag
invite_members_group_modalremoved.
Similar to how you share a project with a group,
you can share a group with another group. To invite a group, you must be a member of it.
To share a given group, for example, Frontend with another group, for example,
Engineering:
- Go to the
Frontendgroup. - On the left sidebar, select Group information > Members.
- Select Invite a group.
- In the Select a group to invite list, select
Engineering. - Select a role as maximum access level.
- Select Invite.
After sharing the Frontend group with the Engineering group:
- The Groups tab lists the
Engineeringgroup. - The Groups tab lists a group regardless of whether it is a public or private group.
- All direct members of the
Engineeringgroup have access to theFrontendgroup. Direct members ofEngineeringthat gain access to theFrontendgroup keep their same access level as inEngineering, but up to the maximum access level selected when sharing the group. Inherited members of theEngineeringgroup do not gain access to theFrontendgroup.
Transfer a group
Transferring groups moves them from one place to another in the same GitLab instance. You can:
- Transfer a subgroup to a new parent group.
- Convert a top-level group into a subgroup by transferring it to the desired group.
- Convert a subgroup into a top-level group by transferring it out of its current group.
If you need to copy a group to a different GitLab instance, migrate the group by direct transfer.
When transferring groups, note:
- Changing a group's parent can have unintended side effects. See what happens when a repository path changes.
- You must have the Owner role in the source and target group.
- You must update your local repositories to point to the new location.
- If the immediate parent group's visibility is lower than the group's current visibility, visibility levels for subgroups and projects change to match the new parent group's visibility.
- Only explicit group membership is transferred, not inherited membership. If the group's owners have only inherited membership, this leaves the group without an owner. In this case, the user transferring the group becomes the group's owner.
- Transfers fail if packages exist in any of the projects in the group, or in any of its subgroups.
- Top-level groups that have a subscription on GitLab.com cannot be transferred. To make the transfer possible, the top-level group's subscription must be removed first. Then the top-level group can be transferred as a subgroup to another top-level group.
To transfer a group:
- On the top bar, select Main menu > Groups and find your group.
- On the left sidebar, select Settings > General.
- Expand the Advanced section.
- In the Remove group section, select Transfer group.
- Select the group name in the drop down menu.
- Select Transfer group.
Enable delayed project deletion (PREMIUM)
- Introduced in GitLab 13.2.
- Inheritance and enforcement added in GitLab 13.11.
- Instance setting to enable by default added in GitLab 14.2.
- Instance setting is inherited and enforced when disabled in GitLab 15.1.
- User interface changed in GitLab 15.1.
- Removed in GitLab 15.11 with a flag named
always_perform_delayed_deletion. Disabled by default.
Delayed project deletion is locked and disabled unless the instance-level settings for deletion protection are enabled for either groups only or groups and projects. When enabled on groups, projects in the group are deleted after a period of delay. During this period, projects are in a read-only state and can be restored. The default period is seven days but is configurable at the instance level.
On self-managed GitLab, projects are deleted immediately by default. In GitLab 14.2 and later, an administrator can change the default setting for projects in newly-created groups.
On GitLab.com, see the GitLab.com settings page for the default setting.
To enable delayed deletion of projects in a group:
- On the top bar, select Main menu > Groups and find your group.
- On the left sidebar, select Settings > General.
- Expand the Permissions and group features section.
- Scroll to:
- (GitLab 15.1 and later) Deletion protection and select Keep deleted projects.
- (GitLab 15.0 and earlier) Enable delayed project deletion and tick the checkbox.
- Optional. To prevent subgroups from changing this setting, select:
- (GitLab 15.1 and later), Enforce deletion protection for all subgroups
- (GitLab 15.0 and earlier), Enforce for all subgroups.
- Select Save changes.
In GitLab 13.11 and later, the group setting for delayed project deletion is inherited by subgroups. As discussed in Cascading settings, inheritance can be overridden unless enforced by an ancestor.
In GitLab 15.11 with the always_perform_delayed_deletion feature flag enabled, this setting is removed
and all projects are deleted after the retention period defined by the admin.
Disable email notifications
Introduced in GitLab 12.2.
You can disable all email notifications related to the group, which includes its subgroups and projects.
To disable email notifications:
- On the top bar, select Main menu > Groups and find your group.
- On the left sidebar, select Settings > General.
- Expand the Permissions and group features section.
- Select Email notifications are disabled.
- Select Save changes.
Disable group mentions
Introduced in GitLab 12.6.
You can prevent users from being added to a conversation and getting notified when anyone mentions a group in which those users are members.
Groups with disabled mentions are visualized accordingly in the autocompletion dropdown list.
This is particularly helpful for groups with a large number of users.
To disable group mentions:
- On the top bar, select Main menu > Groups and find your group.
- On the left sidebar, select Settings > General.
- Expand the Permissions and group features section.
- Select Group mentions are disabled.
- Select Save changes.
Export members as CSV (PREMIUM)
- Introduced in GitLab 14.2.
- Feature flag removed in GitLab 14.5.
You can export a list of members in a group or subgroup as a CSV.
- On the top bar, select Main menu > Groups and find your group or subgroup.
- On the left sidebar, select either Group information > Members or Subgroup information > Members.
- Select Export as CSV.
- After the CSV file has been generated, it is emailed as an attachment to the user that requested it.
The output lists direct members and members inherited from the ancestor groups.
For members with Minimal Access in the selected group, their Max Role and Source are derived from their membership in subgroups.
Issue 390358 tracks the discussion about the group members CSV export list not matching the UI members list.
User cap for groups
Introduced in GitLab 14.7.
FLAG: On self-managed GitLab, this feature is not available. On GitLab.com, this feature is available for some groups. This feature is not ready for production use.
When the number of billable members reaches the user cap, new users can't be added to the group without being approved by the group owner.
Groups with the user cap feature enabled have group sharing disabled for the group and its subgroups.
Specify a user cap for a group
Prerequisite:
- You must be assigned the Owner role for the group.
To specify a user cap:
- On the top bar, select Main menu > Groups and find your group. You can set a cap on the top-level group only.
- On the left sidebar, select Settings > General.
- Expand Permissions and group features.
- In the User cap box, enter the desired number of users.
- Select Save changes.
If you already have more users in the group than the user cap value, users are not removed. However, you can't add more without approval.
Increasing the user cap does not approve pending members.
Remove the user cap for a group
You can remove the user cap, so there is no limit on the number of members you can add to a group.
Prerequisite:
- You must be assigned the Owner role) for the group.
To remove the user cap:
- On the top bar, select Main menu > Groups and find your group.
- On the left sidebar, select Settings > General.
- Expand Permissions and group features.
- In the User cap box, delete the value.
- Select Save changes.
Decreasing the user cap does not approve pending members.
Approve pending members for a group
When the number of billable users reaches the user cap, any new member is put in a pending state and must be approved.
Pending members do not count as billable. Members count as billable only after they have been approved and are no longer in a pending state.
Prerequisite:
- You must be assigned the Owner role) for the group.
To approve members that are pending because they've exceeded the user cap:
- On the top bar, select Main menu > Groups and find your group.
- On the left sidebar, select Settings > Usage Quotas.
- On the Seats tab, under the alert, select View pending approvals.
- For each member you want to approve, select Approve.
Group file templates (PREMIUM)
Use group file templates to share a set of templates for common file types with every project in a group. It is analogous to the instance template repository. The selected project should follow the same naming conventions as are documented on that page.
You can only choose projects in the group as the template source. This includes projects shared with the group, but it excludes projects in subgroups or parent groups of the group being configured.
You can configure this feature for both subgroups and immediate parent groups. A project in a subgroup has access to the templates for that subgroup and any immediate parent groups.
To learn how to create templates for issues and merge requests, see description templates.
Define project templates at a group level by setting a group as the template source. For more information, see group-level project templates.
Enable group file template (PREMIUM)
To enable group file templates:
- On the top bar, select Main menu > Groups and find your group.
- On the left sidebar, select Settings > General.
- Expand the Templates section.
- Choose a project to act as the template repository.
- Select Save changes.
Group merge checks settings (PREMIUM)
Introduced in GitLab 15.9 with a flag name
support_group_level_merge_checks_setting. Disabled by default.
FLAG:
On self-managed GitLab, by default this feature is not available. To make it available, ask an administrator to
enable the feature flag named support_group_level_merge_checks_setting. On GitLab.com, this feature is not
available.
Group owners can set up merge request checks on a top-level group, which apply to all subgroups and projects.
If the settings are inherited by a subgroup or project, they cannot be changed in the subgroup or project that inherited them.
Require a successful pipeline for merge
You can configure all child projects in your group to require a complete and successful pipeline before merge.
See also the project-level setting.
Prerequisites:
- You must be the owner of the group.
To enable this setting:
- On the top bar, select Main menu > Groups and find your group.
- On the left sidebar, select Settings > General.
- Expand Merge requests.
- Under Merge checks, select Pipelines must succeed. This setting also prevents merge requests from being merged if there is no pipeline.
- Select Save changes.
Allow merge after skipped pipelines
You can configure skipped pipelines from preventing merge requests from being merged.
See also the project-level setting.
Prerequisite:
- You must be the owner of the group.
To change this behavior:
- On the top bar, select Main menu > Groups and find your group.
- On the left sidebar, select Settings > General.
- Expand Merge requests.
- Under Merge checks:
- Select Pipelines must succeed.
- Select Skipped pipelines are considered successful.
- Select Save changes.
Prevent merge unless all threads are resolved
You can prevent merge requests from being merged until all threads are resolved. When this setting is enabled, for all child projects in your group, the Unresolved threads count in a merge request is shown in orange when at least one thread remains unresolved.
Prerequisite:
- You must be the owner of the group.
To enable this setting:
- On the top bar, select Main menu > Groups and find your group.
- On the left sidebar, select Settings > General.
- Expand Merge requests.
- Under Merge checks, select All threads must be resolved.
- Select Save changes.
Group merge request approval settings (PREMIUM)
- Introduced in GitLab 13.9. Deployed behind the
group_merge_request_approval_settings_feature_flagflag, disabled by default.- Enabled by default in GitLab 14.5.
- Feature flag
group_merge_request_approval_settings_feature_flagremoved in GitLab 14.9.
Group approval settings manage project merge request approval settings at the top-level group level. These settings cascade to all projects that belong to the group.
To view the merge request approval settings for a group:
- On the top bar, select Main menu > Groups and find your group.
- On the left sidebar, select Settings > General.
- Expand the Merge request approvals section.
- Select the settings you want.
- Select Save changes.
Support for group-level settings for merge request approval rules is tracked in this epic.
Group Code Suggestions (ULTIMATE)
Introduced in GitLab 15.11.
WARNING: This feature is in Beta. Code Suggestions use generative AI to suggest code while you're developing. Due to high demand, this feature will have unscheduled downtime and code suggestions in VS Code may be delayed. Code Suggestions may produce low-quality or incomplete suggestions. Beta users should read about the known limitations. We look forward to hearing your feedback.
This setting enables users in the group to access Code Suggestions. This setting cascades to all projects that belong to the group.
To enable Code Suggestions for a group:
- On the top bar, select Main menu > Groups and find your group.
- On the left sidebar, select Settings > General.
- Expand the Permissions and group features section.
- Find the Code Suggestions settings.
- Select Save changes.
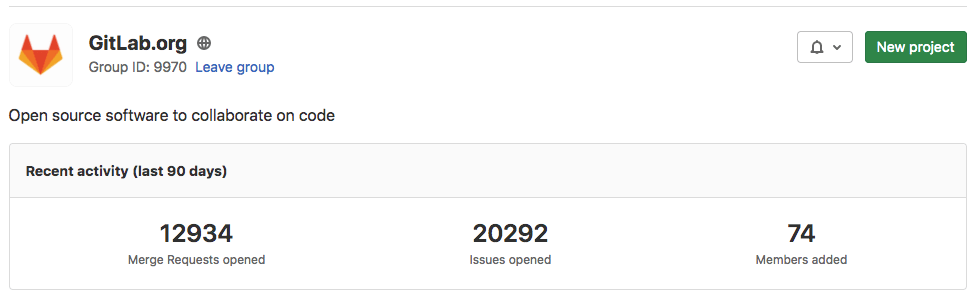
Group activity analytics (PREMIUM)
Introduced in GitLab 12.10 as a Beta feature.
For a group, you can view how many merge requests, issues, and members were created in the last 90 days.
These Group Activity Analytics can be enabled with the group_activity_analytics feature flag.
Changes to group wikis do not appear in group activity analytics.
View group activity
You can view the most recent actions taken in a group, either in your browser or in an RSS feed:
- On the top bar, select Main menu > Groups > View all groups and find your group.
- On the left sidebar, select Group information > Activity.
To view the activity feed in Atom format, select the RSS ({rss}) icon.
Troubleshooting
Validation errors on namespaces and groups
GitLab 14.4 and later performs the following checks when creating or updating namespaces or groups:
- Namespaces must not have parents.
- Group parents must be groups and not namespaces.
In the unlikely event that you see these errors in your GitLab installation, contact Support so that we can improve this validation.
Find groups using an SQL query
To find and store an array of groups based on an SQL query in the rails console:
# Finds groups and subgroups that end with '%oup'
Group.find_by_sql("SELECT * FROM namespaces WHERE name LIKE '%oup'")
=> [#<Group id:3 @test-group>, #<Group id:4 @template-group/template-subgroup>]
Transfer subgroup to another location using Rails console
If transferring a group doesn't work through the UI or API, you may want to attempt the transfer in a Rails console session:
WARNING: Commands that change data can cause damage if not run correctly or under the right conditions. Always run commands in a test environment first and have a backup instance ready to restore.
user = User.find_by_username('<username>')
group = Group.find_by_name("<group_name>")
## Set parent_group = nil to make the subgroup a top-level group
parent_group = Group.find_by(id: "<group_id>")
service = ::Groups::TransferService.new(group, user)
service.execute(parent_group)
Find groups pending deletion using Rails console
If you need to find all the groups that are pending deletion, you can use the following command in a Rails console session:
Group.all.each do |g|
 if g.marked_for_deletion?
    puts "Group ID: #{g.id}"
    puts "Group name: #{g.name}"
    puts "Group path: #{g.full_path}"
 end
end
Delete a group using Rails console
At times, a group deletion may get stuck. If needed, in a Rails console session, you can attempt to delete a group using the following command:
WARNING: Commands that change data can cause damage if not run correctly or under the right conditions. Always run commands in a test environment first and have a backup instance ready to restore.
GroupDestroyWorker.new.perform(group_id, user_id)Find a user's maximum permissions for a group or project
Administrators can find a user's maximum permissions for a group or project.
-
Start a Rails console session.
-
Run the following commands:
user = User.find_by_username 'username'
project = Project.find_by_full_path 'group/project'
user.max_member_access_for_project project.id
user = User.find_by_username 'username' group = Group.find_by_full_path 'group' user.max_member_access_for_group group.id