Control access and visibility (FREE SELF)
GitLab enables users with administrator access to enforce specific controls on branches, projects, snippets, groups, and more.
To access the visibility and access control options:
- Sign in to GitLab as a user with Administrator access level.
- On the top bar, select Main menu > Admin.
- On the left sidebar, select Settings > General.
- Expand the Visibility and access controls section.
Define which roles can create projects
Instance-level protections for project creation define which roles can add projects to a group on the instance. To alter which roles have permission to create projects:
- Sign in to GitLab as a user with Administrator access level.
- On the top bar, select Main menu > Admin.
- On the left sidebar, select Settings > General.
- Expand the Visibility and access controls section.
- For Default project creation protection, select the desired roles:
- No one.
- Maintainers.
- Developers and Maintainers.
- Select Save changes.
Restrict project deletion to administrators (PREMIUM SELF)
User interface changed in GitLab 15.1.
By default both administrators and anyone with the Owner role can delete a project. To restrict project deletion to only administrators:
- Sign in to GitLab as a user with administrator access.
- On the top bar, select Main menu > Admin.
- On the left sidebar, select Settings > General.
- Expand the Visibility and access controls section.
- Scroll to:
- (GitLab 15.1 and later) Allowed to delete projects, and select Administrators.
- (GitLab 15.0 and earlier) Default project deletion protection and select Only admins can delete project.
- Select Save changes.
Deletion protection (PREMIUM SELF)
- Introduced in GitLab 14.2 for groups created after August 12, 2021.
- Renamed from default delayed project deletion in GitLab 15.1.
- Enabled for projects in personal namespaces in GitLab 15.1.
- Disabled for projects in personal namespaces in GitLab 15.3.
- Removed option to delete immediately in GitLab 15.11 with a flag named
always_perform_delayed_deletion. Disabled by default.
Instance-level protection against accidental deletion of groups and projects.
Retention period
Changed in GitLab 15.1.
Groups and projects remain restorable within a defined retention period. By default this is 7 days but it can be changed.
Setting the retention period to 0 means that groups and project are removed immediately and cannot be restored.
In GitLab 15.1 and later, the retention period must be between 1 and 90. If the retention period was 0 before the 15.1 update,
then it gets automatically changed to 1 while also disabling deletion protection the next time any application setting is changed.
Delayed project deletion
User interface changed in GitLab 15.1.
Administrators can enable delayed project deletion by default for newly-created groups. Group owners can choose to disable this. When disabled, existing groups retain their existing setting. When enabled deleted groups remain restorable within a retention period.
To configure delayed project deletion:
- Sign in to GitLab as a user with administrator access.
- On the top bar, select Main menu > Admin.
- On the left sidebar, select Settings > General.
- Expand the Visibility and access controls section.
- Scroll to:
- (GitLab 15.11 and later with
always_perform_delayed_deletionfeature flag enabled) Deletion protection and set the retention period to a value between1and90. - (GitLab 15.1 and later) Deletion protection and select keep deleted groups and projects, and select a retention period.
- (GitLab 15.0 and earlier) Default delayed project protection and select Enable delayed project deletion by default for newly-created groups. Then set a retention period in Default deletion delay.
- (GitLab 15.11 and later with
- Select Save changes.
Deletion protection is not available for projects only (without being also being enabled for groups).
In GitLab 15.1, and later this setting is enforced on groups when disabled and it cannot be overridden.
Delayed group deletion
User interface introduced in GitLab 15.1.
Groups remain restorable if the retention period is 1 or more days.
In GitLab 15.1 and later, delayed group deletion can be enabled by setting Deletion projection to Keep deleted.
In GitLab 15.11 and later with the always_perform_delayed_deletion feature flag enabled:
- The Keep deleted option is removed.
- Delayed group deletion is the default.
Override defaults and delete immediately
Alternatively, projects that are marked for removal can be deleted immediately. To do so:
- Restore the project.
- Delete the project as described in the Administering Projects page.
Configure project visibility defaults
To set the default visibility levels for new projects:
- Sign in to GitLab as a user with Administrator access level.
- On the top bar, select Main menu > Admin.
- On the left sidebar, select Settings > General.
- Expand the Visibility and access controls section.
- Select the desired default project visibility:
- Private - Project access must be granted explicitly to each user. If this project is part of a group, access is granted to members of the group.
- Internal - The project can be accessed by any authenticated user except external users.
- Public - The project can be accessed without any authentication.
- Select Save changes.
Configure snippet visibility defaults
To set the default visibility levels for new snippets:
- Sign in to GitLab as a user with Administrator access level.
- On the top bar, select Main menu > Admin.
- On the left sidebar, select Settings > General.
- Expand the Visibility and access controls section.
- Select the desired default snippet visibility.
- Select Save changes.
For more details on snippet visibility, read Project visibility.
Configure group visibility defaults
To set the default visibility levels for new groups:
- Sign in to GitLab as a user with Administrator access level.
- On the top bar, select Main menu > Admin.
- On the left sidebar, select Settings > General.
- Expand the Visibility and access controls section.
- Select the desired default group visibility:
- Private - The group and its projects can only be viewed by members.
- Internal - The group and any internal projects can be viewed by any authenticated user except external users.
- Public - The group and any public projects can be viewed without any authentication.
- Select Save changes.
For more details on group visibility, see Group visibility.
Restrict visibility levels
To restrict visibility levels for groups, projects, snippets, and selected pages:
- Sign in to GitLab as a user with Administrator access level.
- On the top bar, select Main menu > Admin.
- On the left sidebar, select Settings > General.
- Expand the Visibility and access controls section.
- In the Restricted visibility levels section, select the desired visibility levels to restrict.
- If you restrict the Public level:
- Only administrators are able to create public groups, projects, and snippets.
- User profiles are only visible to authenticated users through the Web interface.
- User attributes through the GraphQL API are:
- Not visible in GitLab 15.1 and later.
- Only visible to authenticated users between GitLab 13.1 and GitLab 15.0.
- If you restrict the Internal level:
- Only administrators are able to create internal groups, projects, and snippets.
- If you restrict the Private level:
- Only administrators are able to create private groups, projects, and snippets.
- If you restrict the Public level:
- Select Save changes.
For more details on project visibility, see Project visibility.
Configure allowed import sources
You can specify from which hosting sites users can import their projects:
- Sign in to GitLab as a user with Administrator access level.
- On the top bar, select Main menu > Admin.
- On the left sidebar, select Settings > General.
- Expand the Visibility and access controls section.
- Select each of Import sources to allow.
- Select Save changes.
Enable project export
To enable the export of projects and their data:
- Sign in to GitLab as a user with Administrator access level.
- On the top bar, select Main menu > Admin.
- On the left sidebar, select Settings > General.
- Expand the Visibility and access controls section.
- Scroll to Project export.
- Select the Enabled checkbox.
- Select Save changes.
Enable migration of groups and projects by direct transfer
Introduced in GitLab 15.8.
You can enable migration of groups by direct transfer using the UI.
To enable migration of groups by direct transfer:
- Sign in to GitLab as a user with Administrator access level.
- On the top bar, select Main menu > Admin.
- On the left sidebar, select Settings > General.
- Expand the Visibility and access controls section.
- Scroll to Allow migrating GitLab groups and projects by direct transfer.
- Select the Enabled checkbox.
- Select Save changes.
The same setting
is available in the API as the
bulk_import_enabled attribute.
Configure enabled Git access protocols
With GitLab access restrictions, you can select the protocols users can use to communicate with GitLab. Disabling an access protocol does not block port access to the server itself. The ports used for the protocol, SSH or HTTP(S), are still accessible. The GitLab restrictions apply at the application level.
To specify the enabled Git access protocols:
- Sign in to GitLab as a user with Administrator access level.
- On the top bar, select Main menu > Admin.
- On the left sidebar, select Settings > General.
- Expand the Visibility and access controls section.
- Select the desired Git access protocols:
- Both SSH and HTTP(S)
- Only SSH
- Only HTTP(S)
- Select Save changes.
When both SSH and HTTP(S) are enabled, users can choose either protocol. If only one protocol is enabled:
-
The project page shows only the allowed protocol's URL, with no option to change it.
-
GitLab shows a tooltip when you hover over the protocol for the URL, if user action (such as adding a SSH key or setting a password) is required:

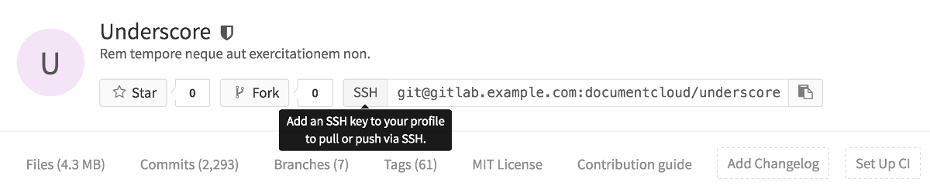
GitLab only allows Git actions for the protocols you select.
WARNING: GitLab versions 10.7 and later, allow the HTTP(S) protocol for Git clone or fetch requests done by GitLab Runner from CI/CD jobs, even if you select Only SSH.
Customize Git clone URL for HTTP(S)
Introduced in GitLab 12.4.
You can customize project Git clone URLs for HTTP(S), which affects the clone panel:
For example, if:
- Your GitLab instance is at
https://example.com, then project clone URLs are likehttps://example.com/foo/bar.git. - You want clone URLs that look like
https://git.example.com/gitlab/foo/bar.gitinstead, you can set this setting tohttps://git.example.com/gitlab/.

To specify a custom Git clone URL for HTTP(S):
- Enter a root URL for Custom Git clone URL for HTTP(S).
- Select Save changes.
NOTE:
SSH clone URLs can be customized in gitlab.rb by setting gitlab_rails['gitlab_ssh_host'] and
other related settings.
Configure defaults for RSA, DSA, ECDSA, ED25519, ECDSA_SK, ED25519_SK SSH keys
These options specify the permitted types and lengths for SSH keys.
To specify a restriction for each key type:
- Select the desired option from the dropdown list.
- Select Save changes.
For more details, see SSH key restrictions.
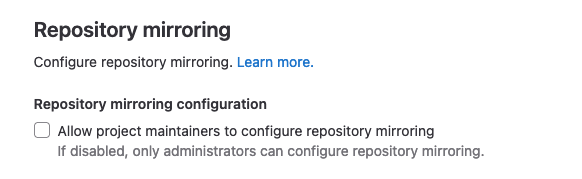
Enable project mirroring
This option is enabled by default. By disabling it, both pull mirroring and push mirroring no longer work in every repository. They can only be re-enabled by an administrator user on a per-project basis.
Configure globally-allowed IP address ranges
- Introduced in GitLab 15.1 with a flag named
group_ip_restrictions_allow_global. Disabled by default.- Generally available in GitLab 15.4. Feature flag
group_ip_restrictions_allow_globalremoved.
Administrators can set IP address ranges to be combined with group-level IP restrictions. Use globally-allowed IP addresses to allow aspects of the GitLab installation to work even when group-level IP address restrictions are set.
For example, if the GitLab Pages daemon runs on the 10.0.0.0/24 range, you can specify that range as globally-allowed.
This means GitLab Pages can still fetch artifacts from pipelines even if group-level IP address restrictions don't
include the 10.0.0.0/24 range.
To add a IP address range to the group-level allowlist:
- Sign in to GitLab as a user with Administrator access level.
- On the top bar, select Main menu > Admin.
- On the left sidebar, select Settings > General.
- Expand the Visibility and access controls section.
- In Globally-allowed IP ranges, provide a list of IP address ranges. This list:
- Has no limit on the number of IP address ranges.
- Has a size limit of 1 GB.
- Applies to both SSH or HTTP authorized IP address ranges. You cannot split this list by type of authorization.
- Select Save changes.