NFV SpecFest Wiki
| Warning: This page is a working draft. Information could be missing or unreliable. Contact the administrator for more support. |
Upload an OpenAPI specification to the ETSI Forge!
Welcome to the Wiki page for the NFV SpecFest event.
Today you have the opportunity to participate in the first collaborative OpenAPI specification on the ETSI Forge.
We will focus our attention on ETSI NFV GS SOL 002<ref>[1] (Download).
What you will need:
- A laptop (any operating system supported)
- A copy (paper or PDF) of NFV SOL 002 specification
- This wiki page.
Let's get started!
Contents
Set up
- Log in at ETSI Forge inserting your EOL accounts
- If you do not have an account yet, simply register here
- Install (if you have not yet) Google Chrome browser.
Starter Kit
To help you start up the activity we provided:
- An example of specification (this is how your work should look like at the end).
- A live spreadsheet to keep track of "who is doing what"
- Open the given spreadsheet and tag one operation with your name
- The operation will then be assigned to you to be edited
In the repository interface, click Snapshot in the menu at the top of the page to download an archive with the files. Otherwise, click on "tree" linke to inspect the content. In the tree page you will find the necessary folders and a template file called `sol002-template.yaml`.
The content of the template is as simple as:
swagger: '2.0'
info:
  title: NFV SOL 002 Example - SpecFest!
  version: v1
host: www.example.com
basePath: /ve-vnfm
paths:
  # insert your paths or their json ref here
definitions:
  # Insert your definitions or their json ref here
Editing
Where to find documentation
- The official reference of OpenAPI Specification v2
- Templates and examples in our nfv-specfest repository
Editing with an offline editor: VS Code Example
Visual Studio Code is a multiplatform, free and open source, extendible editor by Microsoft (similar to SublimeText and Atom Editor). For VS Code a handy plugin is available to render OpenAPIs documentation while typing, therefore we selected this as a suitable tool for our activity. Anyway, feel free to use your preferred editor for the task.
Find below the instructions to render OpenAPI doc in VS Code:
- Open the template file with VS Code (e.g. open or paste the template file sol002-template.yaml)
- Press F1, then write "Swagger preview" and hit Enter. A new tab will open to show the graphical representation of the file. Note that as soon as you change the text, the other tab is automatically updated.
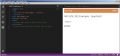
VS Code with the Rendered documentation in the tab on the right of the window.
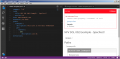
VS Code will show an alert box if the file is not correctly formatted
An example with a valid specification file


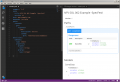
With the online editor
Note: Using Google Chrome as a browser is recommended for this procedure
- Navigate to SOL002 OAS template.
- After editing, click File and then “Download YAML”
Writing the definition
Edit the OpenApi specification:
- Look up the resource you have been assigned in NFV SOL 002
- Create the definition into the nfv002_main_template.yaml and check correctness with VS Code
- Cut&paste what you created into a proper resource in /paths/index.yaml and create the corresponding file
- E.g. create the Vnf_instance data type into a Vnf_instance.yaml file
- Configure the files so that the CI/CD validates the result
Online via Gerrit (Beginners)
- Navigate to the project page of nfv-specfest
- Click on the menu Projects -> List -> nfv-specfest
- Click ‘Create Change’ button
- Click 'Edit' in the File list at the bottom of the page
- Now click "Add" to insert a new modification in a file
- If you type the name of a file already existing in the repository, that file will be opened for editing. If, otherwise, you type a new file name, the file will be created.
- As you type, Gerrit will suggest names of files and folder in the repo.
- Now click on the file to open it in the online editor.
- Paste the content you created in your local editor or with the online editor.
- Click Save and Close
- Now click the blue Publish button on the top right of the page.
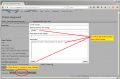
How to create a new Change from gerrit web UI

Editing in the gerrit web UI


With Git (Advanced)
- Upload the contribution via the usual git workflow (please note the unususual push operation endpoint)
  $ git add .
  $ git commit -s -m "your message here"
  $ git push origin HEAD:refs/for/master
Verify
- Check Jenkins result on Gerrit and on Jenkins Job

- If there is no feedback from Jenkins contact CTI
- Wait for CTI to merge your contribution
Iterate!
All accomplished? Then it may be time to select a new part of the specification and create the OpenAPI version again!
Bonus level
Optional: Install an Editor application
It is possible to edit and submit the specification files directly in the browser without the need of installing anything. But that method is a bit more error prone and sometimes less comfortable, therefore a better workflow would require an Editor locally installed on your machine. We list below two different options, both free, open source and with extensions to facilitate work with OpenAPIs.
Anyway, feel free to use your preferred editor: you will need to submit only the plain text.
VS Code
- Navigate to VS Code homepage, download the installer for your platform and execute it
- Install the Swagger Viewer Plugin
Atom Editor
- Navigate to Atom homepage, download the installer for your platform and execute it.
- Install the linter-swagger plugin.
Optional: Set up Git
To install and configure Git on your machine please refer to Get started.
More on the starter kit
- A repository at the Forge, with the folder structure, a template of specification file and some examples. Click here to visit the repository.
- A live spreadsheet to keep track of "who is doing what"
- Open the given spreadsheet and tag one operation with your name
- The operation will then be assigned to you to be edited
TODO
- use only the online editor
- first run is done by presenter
- They can reproduce what the presenter did or choose a new operation
- insert a complete example with one operation (the solution)
- make the offline editors and git a BONUS at the bottom
- inserted screenshots in the wiki on how to to step by step
- more clear and repeated link to SPEC + bring a paper version of an extract (need to make it) after installation part
- no link to portal page
- instructions for vs code plugin are not correct
- provide examples in wiki as screenshots
- fix the snapshot operation
- Just point to the online editor
- send email with
- printout and link to specs
- install google chrome
- install git and offline editors if you need
- right click to get the snapshot
- fix NFV meeting ID in readme of the repository
- put again link to handy plugins for vs code
- fix all links to repositories so that they refer to the tree page
- get rid of the sub-folder structure
- Check ms edge, opera and safari to see if swagger editor works