Difference between revisions of "NFV SpecFest Wiki"
(→Verify) |
|||
| Line 73: | Line 73: | ||
</gallery> | </gallery> | ||
| − | == Verify == | + | == Step 3: Verify == |
# Check Jenkins result on Gerrit and on Jenkins Job (go to https://forge.etsi.org/gerrit/#/dashboard/self) | # Check Jenkins result on Gerrit and on Jenkins Job (go to https://forge.etsi.org/gerrit/#/dashboard/self) | ||
Revision as of 10:57, 18 August 2017
| Warning: This page is a working draft. Information could be missing or unreliable. Contact the administrator for more support. |
Upload an OpenAPI specification to the ETSI Forge!
Welcome to the Wiki page for the NFV SpecFest event.
Today you have the opportunity to participate in the first collaborative OpenAPI specification on the ETSI Forge. The proposed activity aims at translating an extract of an ETSI NFV specification into a machine readable API description, formatted in the OpenAPIs language.
We will focus our attention on ETSI NFV GS SOL 002[1](Download here).
What you will need:
- A laptop (any operating system supported)
- A copy (paper or PDF) of NFV SOL 002 specification (Download here). Section 5.4.2.2 is fundamental for the next steps.
- This wiki page.
Let's get started!
Contents
Step 0: Set up
- Log in at ETSI Forge inserting your EOL accounts
- If you do not have an account yet, simply register here
- Install (if you have not yet) Google Chrome browser.
Step 1: Edit the template
| Make sure you are using Google Chrome as your browser from this point |
To edit the OpenApi specification online:
- Open the template of a specification: this will be your starting point; it is a already structured file where you will need to insert the appropriate values take from SOL002 specification;
- Look up SOL002, Section 5.4.2.2
(Insert the image here)
- Create the definition into the nfv002_main_template.yaml and check correctness with VS Code
- Cut&paste what you created into a proper resource in /paths/index.yaml and create the corresponding file
- E.g. create the Vnf_instance data type into a Vnf_instance.yaml file
- Configure the files so that the CI/CD validates the result
- An example of specification: this is how your work should look like at the end;
Step 2: Upload it to the ETSI Forge =
- Navigate to the project page of nfv-specfest
- Click on the
Sign inlink on the top right and the page and log in with your EOL or Forge credentials - Click on the menu Projects -> List -> nfv-specfest
- Click on the
- Click ‘Create Change’ button
- Enter Branch: master
- Enter Change title
- Enter Change description
- Click on
Create
- Click 'Edit' in the File list at the bottom of the page
- Now click "Add" to insert a new modification in a file
- If you type the name of a file already existing in the repository, that file will be opened for editing. If otherwise, you type a new file name, the file will be created.
- As you type, Gerrit will suggest names of files and folder in the repo.
- Now click on the file to open it in the online editor.
- Paste the content you created in your local editor or with the online editor.
- Click Save and Close
- Now click the blue Publish button on the top right of the page.
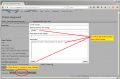
How to create a new Change from gerrit web UI
Click edit at the bottom
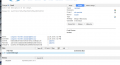
Click Add and insert filename

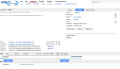
Editing in the gerrit web UI


Step 3: Verify
- Check Jenkins result on Gerrit and on Jenkins Job (go to https://forge.etsi.org/gerrit/#/dashboard/self)

- If there is no feedback from Jenkins contact CTI
- Wait for CTI to merge your contribution
Iterate!
All accomplished? Then it may be time to select a new part of the specification and create the OpenAPI version again!
A live spreadsheet is available to keep track of "who is doing what".
- Open the given spreadsheet and tag one operation with your name
- The operation will then be assigned to you to be edited
Bonus level
OpenAPI v2 language reference
Find OpenAPI Specification v2: the official and complete reference of the language.
Optional: Install an offline Editor application on your system
It is possible to edit and submit the specification files directly in the browser without the need of installing anything. But that method is a bit more error prone and sometimes less comfortable, therefore a better workflow would require an Editor locally installed on your machine. We list below two different options, both free, open source and with extensions to facilitate work with OpenAPIs.
Anyway, feel free to use your preferred editor: you will need to submit only the plain text.
VS Code
- Navigate to VS Code homepage, download the installer for your platform and execute it
- Install the Swagger Viewer Plugin
Editing with VS Code Example
Visual Studio Code is a multiplatform, free and open source, extensible editor by Microsoft (similar to SublimeText and Atom Editor). For VS Code a handy plugin is available to render OpenAPIs documentation while typing, therefore we selected this as a suitable tool for our activity. Anyway, feel free to use your preferred editor for the task.
Find below the instructions to render OpenAPI doc in VS Code:
- Open the template file with VS Code (e.g. open or paste the template file sol002-template.yaml)
- Press F1, then write "Swagger preview" and hit Enter. A new tab will open to show the graphical representation of the file. Note that as soon as you change the text, the other tab is automatically updated.
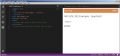
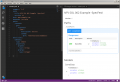
VS Code with the Rendered documentation in the tab on the right of the window.
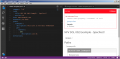
VS Code will show an alert box if the file is not correctly formatted
An example with a valid specification file


Atom Editor
- Navigate to Atom homepage, download the installer for your platform and execute it.
- Install the linter-swagger plugin.
Optional: Set up Git
To install and configure Git on your machine please refer to Get started.
Optional: Upload the contribution via Git
- Upload the contribution via the usual git workflow (please note the unusual push operation endpoint)
  $ git add .
  $ git commit -s -m "your message here"
  $ git push origin HEAD:refs/for/master
More on the starter kit
- A repository at the Forge, with the folder structure, a template of specification file and some examples. Click here to visit the repository.
- A live spreadsheet to keep track of "who is doing what"
- Open the given spreadsheet and tag one operation with your name
- The operation will then be assigned to you to be edited
References
<references />