NFV SpecFest Wiki: Difference between revisions
(Created page with "== Contribute a OAS spec at ETSI Forge! == Create the OAS spec for SOL 002 in a collaborative way. __TOC__ === Set up === # Log in at forge.etsi.org # Go to https://forge.e...") |
(Redirected page to NFV Specfest Wiki) |
||
| (93 intermediate revisions by the same user not shown) | |||
| Line 1: | Line 1: | ||
#REDIRECT [[NFV Specfest Wiki]] | |||
{| class="wikitable" | |||
|- | |||
| ''Dear reader, in case of missing or incorrect information on this wiki page you are welcome to contact us at cti_support@etsi.org''. | |||
|} | |||
== Contribute an OpenAPI<sup>TM</sup> specification to the ETSI Forge! == | |||
Welcome to the Wiki page of the NFV Specfest event. | |||
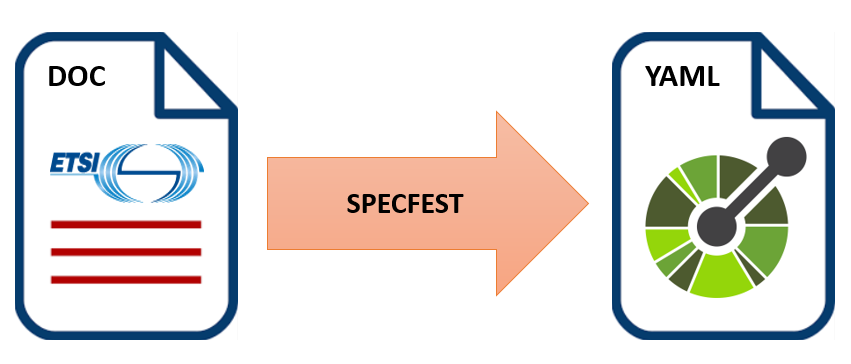
The goal of the present tutorial is to create a collaborative OpenAPI<sup>TM</sup><ref>OpenAPI<sup>TM</sup> is a Trade Mark of the Linux Foundation. Find more info at [https://www.openapis.org www.openapis.org].</ref> specification on the ETSI Forge. The proposed activity aims at '''translating an extract of an [http://www.etsi.org/technologies-clusters/technologies/nfv ETSI NFV] specification into a machine readable API description, formatted in the OpenAPI<sup>TM</sup> language'''. | |||
[[File:NFV Specfest.png|500px|frameless|center]] | |||
The specification used for the task will be ETSI NFV GS SOL 002 [https://portal.etsi.org/webapp/WorkProgram/Report_WorkItem.asp?WKI_ID=49492] and for the sake of brevity, we will use an example document (a greatly simplified extract of the original specification) which describes the operation and data structures to be used in the activity. | |||
<div class="center ext" style="width:auto; margin-left:auto; margin-right:auto;"> | |||
<div style="font-size: 16pt">--> [https://forge.etsi.org/wiki/images/a/ac/Nfv-specfest-sol002-extract.pdf Download SOL002 example here] <--</div> | |||
(The link will automatically open in a new tab) | |||
</div> | |||
What you need: | |||
* A laptop (all operating system supported) with [https://www.google.com/chrome/index.html Google Chrome browser] or [https://www.opera.com/ Opera browser] installed. | |||
* The SOL002 example linked above. | |||
* This wiki page. | |||
Let's get started! | |||
__TOC__ | __TOC__ | ||
== | == Step 0: Set up == | ||
# Log in at forge.etsi.org | |||
# | # Log in at <span class="ext"> [https://forge.etsi.org/index.php/users/login ETSI Forge]</span> using your EOL account information. | ||
# | # If you do not have an account yet, you can register for a ''Forge account'' [https://forge.etsi.org/index.php/register here]. | ||
# nfv-specfest | |||
# | == Step 1: Edit the template == | ||
# | |||
<div class="center" style="color:red;width: 83%;margin-left:auto;margin-right:auto;border: 1px solid black;margin-bottom: 20px;margin-top: 20px;"> | |||
Make sure you are using Google Chrome or Opera as your browser from this point on. | |||
</div> | |||
<big> | |||
You are now ready to edit the OpenApi specification online. Below you will find the link to the online editor which will contain a template with comments and instruction on how to fill in the required information. Please note: | |||
# If you close the Editor page, you will '''loose your work'''. | |||
# Do not worry if you see some errors on the right part of the window: '''keep following the instructions''' in the comments and the errors will disappear. | |||
# The template is divided in two parts: '''Part 1: Resource paths and operations''' and ''' Part 2: Data types definitions''' which refer respectively to pages 1 and 2 of the SOL002 Example given. Part 2 is optional and you can decide whether to tackle it. You will find instructions in the appropriate part of the template. | |||
# Once you are done editing, '''do not close the editor page''' and come back to this wiki page for the next step: '''Contribute the specification to the ETSI Forge'''. | |||
# If you are in doubt, check the '''expected result''' at <span class="ext">[https://forge.etsi.org/swagger/editor/?url=https://forge.etsi.org/rep/gitweb.cgi/nfv-specfest.git/blob_plain/HEAD:/sol002-example.yaml Solution]</span> (The link will automatically open in a new tab); | |||
</big> | |||
<div class="ext center" style="width:auto; margin-left:auto; margin-right:auto"> | |||
<div style="font-size: 16pt">--> [https://forge.etsi.org/swagger/editor/?url=https://forge.etsi.org/rep/gitweb.cgi/nfv-specfest.git/blob_plain/HEAD:/sol002-template.yaml Template to edit] <--</div> | |||
(The link will automatically open in a new tab) | |||
</div> | |||
== Step 2: Contribute the specification to the ETSI Forge == | |||
<big> | |||
After you complete editing the OpenAPI file (Step 1), your next step will be contributing it on the ETSI Forge. You will be using a web interface powered by Gerrit, an open source collaboration tool. | |||
Proceed withe the points below: | |||
# <span class="ext">Navigate to the project page of [https://forge.etsi.org/gerrit/#/admin/projects/nfv-specfest nfv-specfest]</span> | |||
#* If required, click on the <code>Sign in</code> link on the top right and the page to log in with your EOL or Forge credentials. | |||
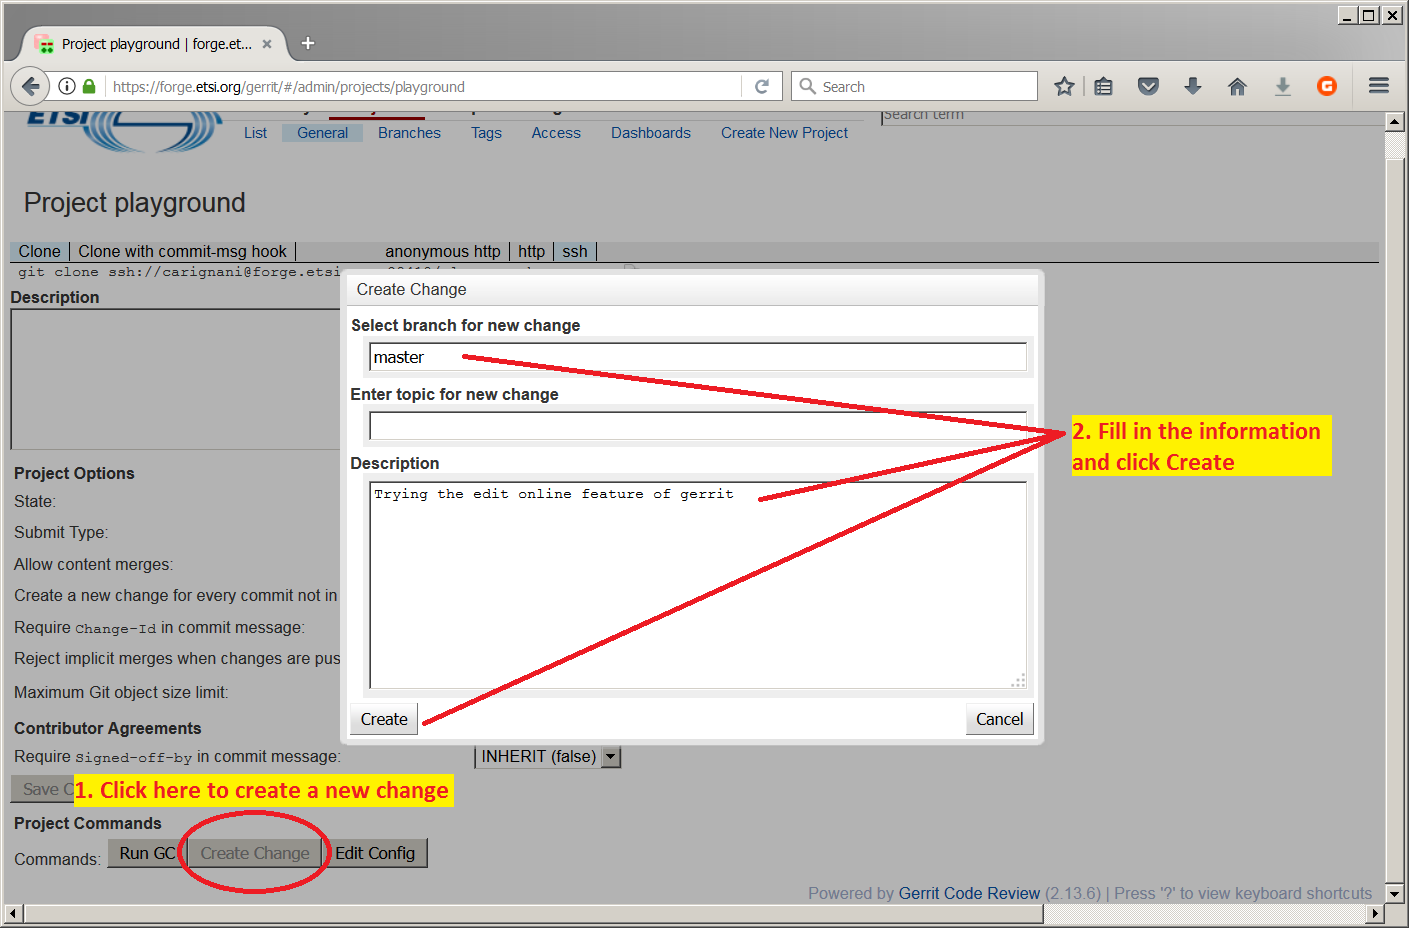
# Click <code>Create Change</code> button | |||
#* Enter Branch: ''master'' | |||
#* Enter Change topic: "specfest" | |||
#* Enter Change description | |||
#* Click on <code>Create</code> | |||
#* [[File:Gerrit-online-change-guide.png|700px|thumb|center|How to create a new Change in the Gerrit web UI]] | |||
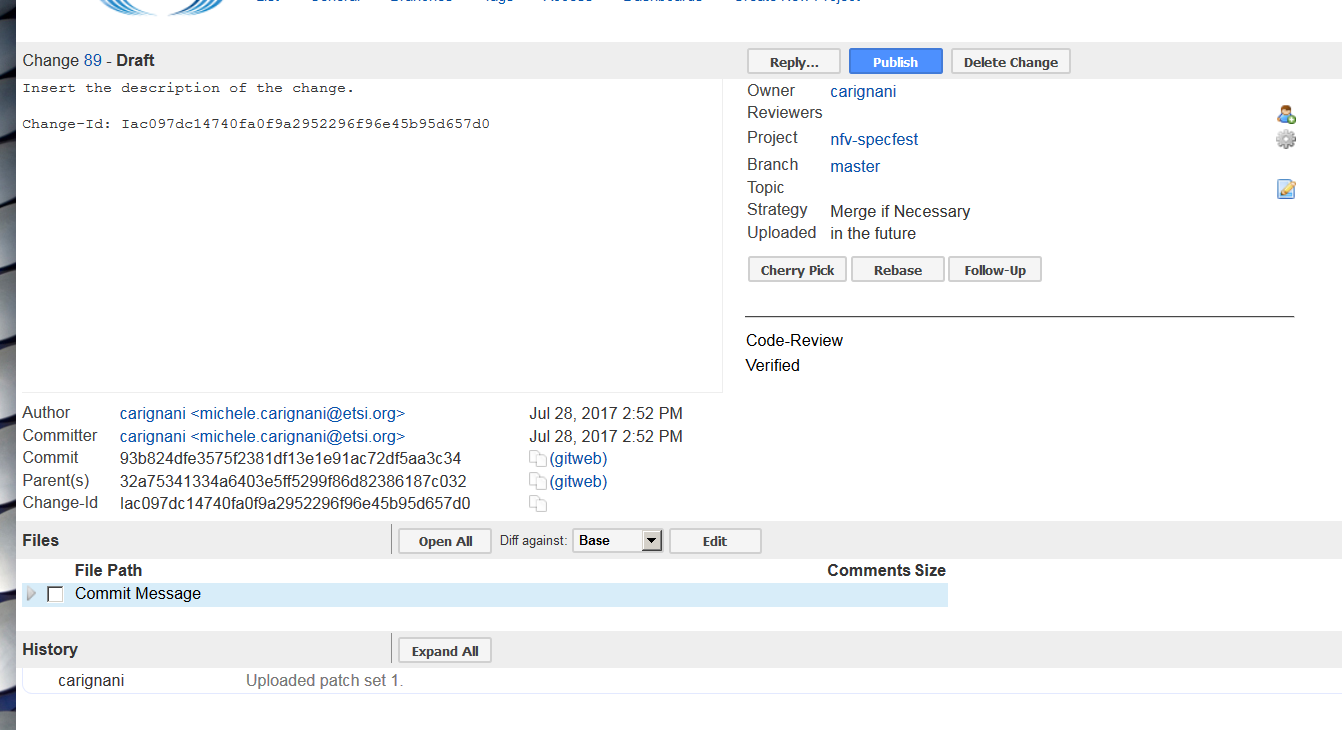
# Click <code>Edit</code> in the File list at the bottom of the page | |||
#* [[File:Gerrit-online-change-add-new-file1.png|700px|thumb|center|Click edit at the bottom]] | |||
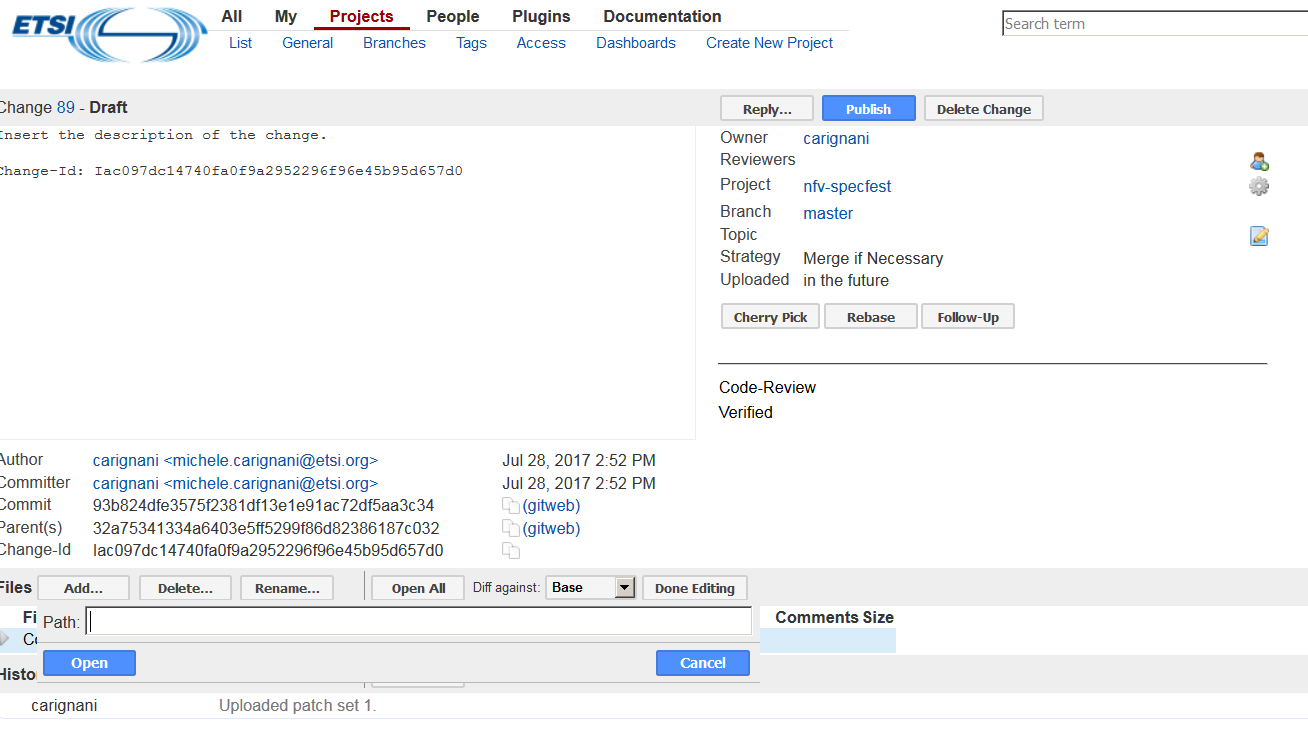
# Now click <code>Add</code> to insert a new modification in a file | |||
#* Now type "upload/[your_name].yaml" (e.g. "upload/jon_snow.yaml") and click <code>Open</code> button. | |||
#* [[File:Gerrit-online-change-add-new-file2.png|700px|thumb|center|Click Add and insert filename]] | |||
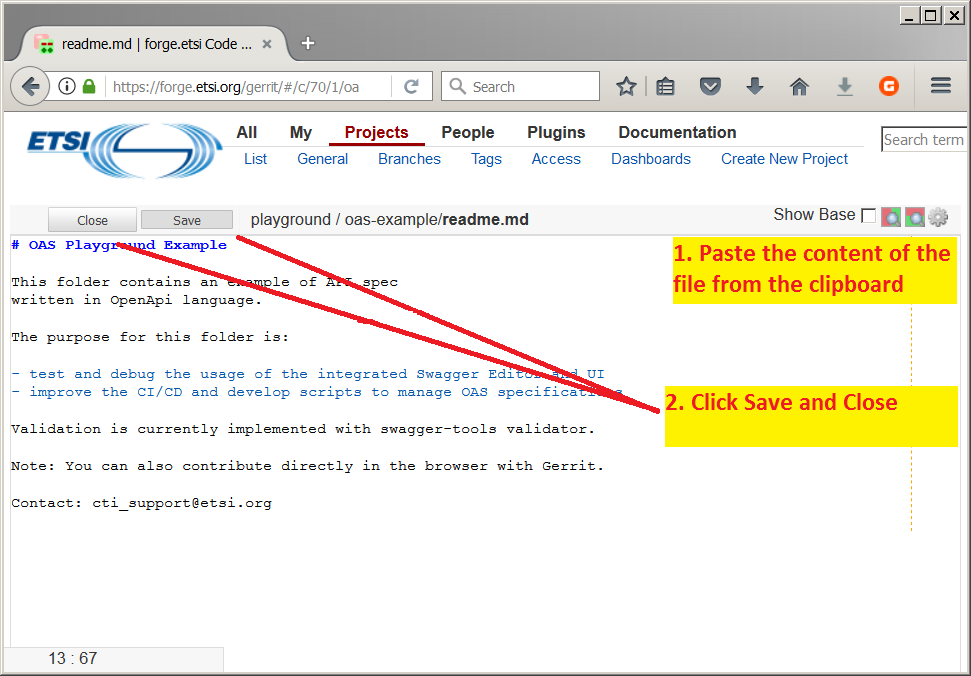
# Copy the whole text from the Swagger Editor tab and paste the content in the newly created file. | |||
# Click <code>Save</code> and then click <code>Close</code> | |||
#* [[File:Gerrit-online-edit-guide.png|700px|thumb|center|Editing a file in the gerrit web UI]] | |||
# Now click the blue <code>Publish edit</code> button and then the <code>Publish</code> button on the top right of the page. | |||
#* [[File:Gerrit-online-change-add-new-file2.png|700px|thumb|center|Click Add and insert filename]] | |||
</big> | |||
== Step 3: Verify == | |||
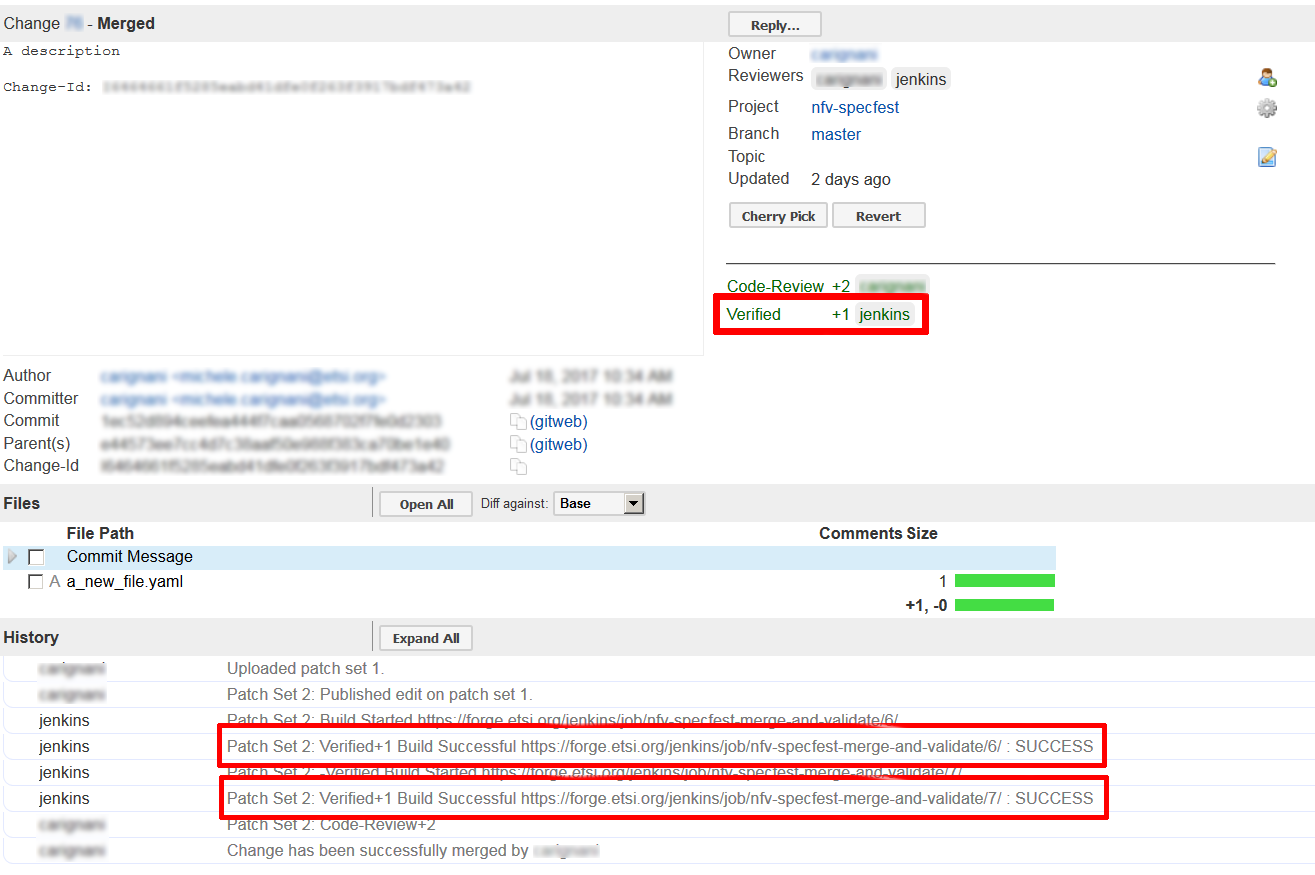
Once you publish your contribution, an automatic validator will be triggered. Wait few minutes and you will see a yellow notification at the bottom right corner of the page (you will also receive notification via email). Click on it to upload the page | |||
The automatic checker (under the name ''jenkins'') will publish the result in the '''History Check''' box in the page. The entry will look like (in case of failure): | |||
Patch Set 2: | |||
Build Failed | |||
https://forge.etsi.org/jenkins/job/nfv-specfest-merge-and-validate/18/ : FAILURE | |||
or (in case of success) | |||
Patch Set 3: | |||
Verified+1 Build Successful | |||
https://forge.etsi.org/jenkins/job/nfv-specfest-merge-and-validate/19/ : SUCCESS | |||
[[File:Gerrit-verify-build-hid.PNG|800px|thumb|center|To verify that the content of the contribution has been validated, look for the text you see in the red boxes in the picture.]] | |||
=== In case of FAILURE === | |||
If the validation job fails you are still able to modify your contribution until it gets valid. Each time you modify the content of the contributed file, the automatic validation will be again activated and will yield a new result. | |||
To edit the contributed file, simply click on the file name in the '''Files''' box within the page to open the editing page again. | |||
Do not forget to save after you complete modify the text! | |||
[[File:Gerrit-verify-build-fixed-guide.png|800px|thumb|center|What to do if the validation fails]] | |||
=== | === In case of SUCCESS === | ||
# If there is no feedback from Jenkins, it will add a label <code>verified +1</code> to the contribution. This means that the contribution can be merged. | |||
# You reached the end of the tutorial! Just wait for ETSI CTI to merge your contribution. | |||
=== | === Congratulations === | ||
You can navigate now and see your contribution at | |||
=== | <div class="center ext" style="width:auto; margin-left:auto; margin-right:auto;"> | ||
<div style="font-size: 16pt">--> [https://forge.etsi.org/rep/gitweb.cgi/nfv-specfest.git/tree/HEAD:/upload the NFV Specfest repository] <--</div> | |||
(The link will automatically open in a new tab) | |||
</div> | |||
= Further readings = | |||
Find more on developing and contributing OpenAPI specifications at [[Describing APIs]] | |||
= References = | |||
Latest revision as of 16:26, 20 September 2017
Redirect to:
| Dear reader, in case of missing or incorrect information on this wiki page you are welcome to contact us at cti_support@etsi.org. |
Contribute an OpenAPITM specification to the ETSI Forge![edit | edit source]
Welcome to the Wiki page of the NFV Specfest event.
The goal of the present tutorial is to create a collaborative OpenAPITM<ref>OpenAPITM is a Trade Mark of the Linux Foundation. Find more info at www.openapis.org.</ref> specification on the ETSI Forge. The proposed activity aims at translating an extract of an ETSI NFV specification into a machine readable API description, formatted in the OpenAPITM language.
The specification used for the task will be ETSI NFV GS SOL 002 [1] and for the sake of brevity, we will use an example document (a greatly simplified extract of the original specification) which describes the operation and data structures to be used in the activity.
(The link will automatically open in a new tab)
What you need:
- A laptop (all operating system supported) with Google Chrome browser or Opera browser installed.
- The SOL002 example linked above.
- This wiki page.
Let's get started!
Step 0: Set up[edit | edit source]
- Log in at ETSI Forge using your EOL account information.
- If you do not have an account yet, you can register for a Forge account here.
Step 1: Edit the template[edit | edit source]
Make sure you are using Google Chrome or Opera as your browser from this point on.
You are now ready to edit the OpenApi specification online. Below you will find the link to the online editor which will contain a template with comments and instruction on how to fill in the required information. Please note:
- If you close the Editor page, you will loose your work.
- Do not worry if you see some errors on the right part of the window: keep following the instructions in the comments and the errors will disappear.
- The template is divided in two parts: Part 1: Resource paths and operations and Part 2: Data types definitions which refer respectively to pages 1 and 2 of the SOL002 Example given. Part 2 is optional and you can decide whether to tackle it. You will find instructions in the appropriate part of the template.
- Once you are done editing, do not close the editor page and come back to this wiki page for the next step: Contribute the specification to the ETSI Forge.
- If you are in doubt, check the expected result at Solution (The link will automatically open in a new tab);
(The link will automatically open in a new tab)
Step 2: Contribute the specification to the ETSI Forge[edit | edit source]
After you complete editing the OpenAPI file (Step 1), your next step will be contributing it on the ETSI Forge. You will be using a web interface powered by Gerrit, an open source collaboration tool. Proceed withe the points below:
- Navigate to the project page of nfv-specfest
- If required, click on the
Sign inlink on the top right and the page to log in with your EOL or Forge credentials.
- If required, click on the
- Click
Create Changebutton- Enter Branch: master
- Enter Change topic: "specfest"
- Enter Change description
- Click on
Create
- Click
Editin the File list at the bottom of the page - Now click
Addto insert a new modification in a file- Now type "upload/[your_name].yaml" (e.g. "upload/jon_snow.yaml") and click
Openbutton.
- Now type "upload/[your_name].yaml" (e.g. "upload/jon_snow.yaml") and click
- Copy the whole text from the Swagger Editor tab and paste the content in the newly created file.
- Click
Saveand then clickClose - Now click the blue
Publish editbutton and then thePublishbutton on the top right of the page.
Step 3: Verify[edit | edit source]
Once you publish your contribution, an automatic validator will be triggered. Wait few minutes and you will see a yellow notification at the bottom right corner of the page (you will also receive notification via email). Click on it to upload the page
The automatic checker (under the name jenkins) will publish the result in the History Check box in the page. The entry will look like (in case of failure):
  Patch Set 2:
  Build Failed
  https://forge.etsi.org/jenkins/job/nfv-specfest-merge-and-validate/18/ : FAILURE
or (in case of success)
  Patch Set 3:
  Verified+1 Build Successful
  https://forge.etsi.org/jenkins/job/nfv-specfest-merge-and-validate/19/ : SUCCESS
In case of FAILURE[edit | edit source]
If the validation job fails you are still able to modify your contribution until it gets valid. Each time you modify the content of the contributed file, the automatic validation will be again activated and will yield a new result.
To edit the contributed file, simply click on the file name in the Files box within the page to open the editing page again. Do not forget to save after you complete modify the text!
In case of SUCCESS[edit | edit source]
- If there is no feedback from Jenkins, it will add a label
verified +1to the contribution. This means that the contribution can be merged. - You reached the end of the tutorial! Just wait for ETSI CTI to merge your contribution.
Congratulations[edit | edit source]
You can navigate now and see your contribution at
(The link will automatically open in a new tab)
Further readings[edit | edit source]
Find more on developing and contributing OpenAPI specifications at Describing APIs
